Enzyme Cleaner for Tile and Grout: What Works
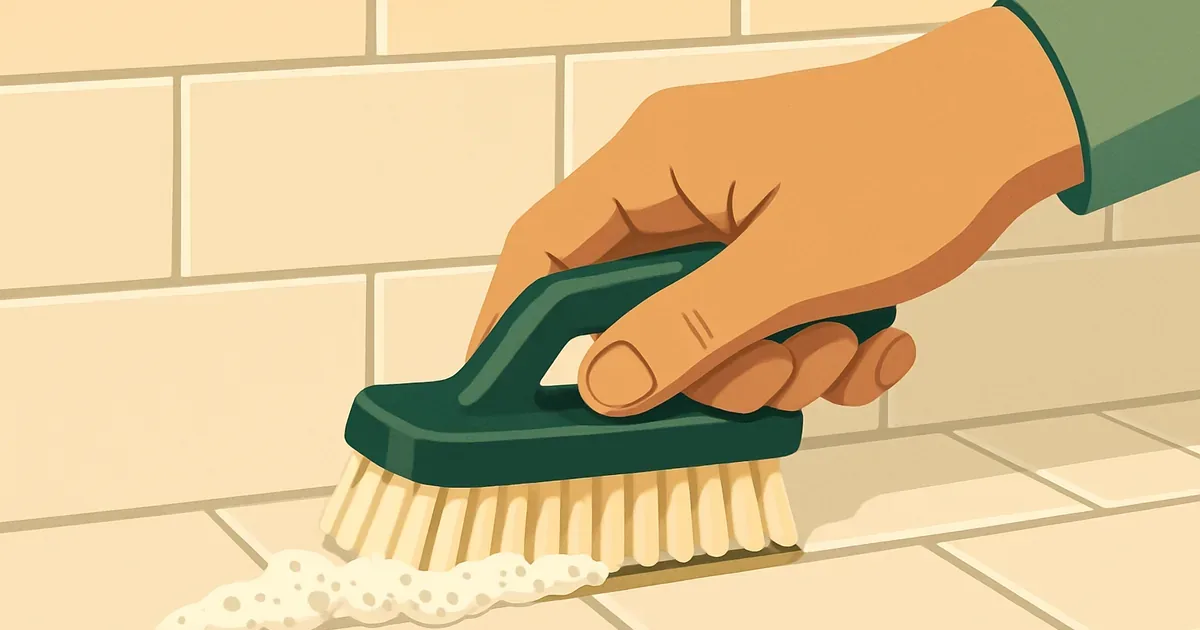
Table of Contents
Grout is porous, which means it traps food particles, body oils, soap scum, and other organic matter deep in its surface. Enzyme cleaners break down this trapped grime without the harsh fumes of bleach or the surface damage of acidic cleaners. The key is the brush-and-dwell method: scrub the enzyme cleaner into the grout lines, then let it sit for 30-60 minutes so the enzymes can digest the buildup.
Below, we cover why enzymes work on grout, the step-by-step brush-and-dwell method, which enzyme types you need, and when enzymes won’t be enough. For a broader look at enzyme cleaner basics, read our guide on how enzyme cleaners work.
Why Grout Traps So Much Grime
Grout is porous like concrete because it basically is concrete. It’s a mix of cement, water, and sand that hardens into a rough, textured surface full of tiny openings.
Those pores absorb everything they touch. Food spills, body oils, soap residue, skin cells, and dirty mop water get pushed into the grout surface by foot traffic and daily use. Surface-level mopping only cleans the top. It doesn’t reach into the pores where grime accumulates. The Natural Stone Institute recommends pH-neutral cleaners for tile and stone surfaces to avoid etching or discoloration.
Over time, bacteria colonize the trapped organic matter and form biofilm. Biofilm is a thin, slimy bacterial layer that feeds on the organics embedded in the grout. This biofilm is what makes grout look dark and dingy over time. If you also want to tackle pet stains on tile, check our guide on removing urine stains with enzyme cleaners.
ℹ️ Note
Most discolored grout isn’t moldy. It’s biofilm, a bacterial layer feeding on trapped organic matter. Enzyme cleaners are built to break down exactly this type of buildup. Bleach can whiten the surface, but it doesn’t remove the organic layer feeding the bacteria.
Biofilm vs. Mold (Know What You’re Dealing With)
This distinction matters because enzyme cleaners handle one of these problems well and the other not at all.
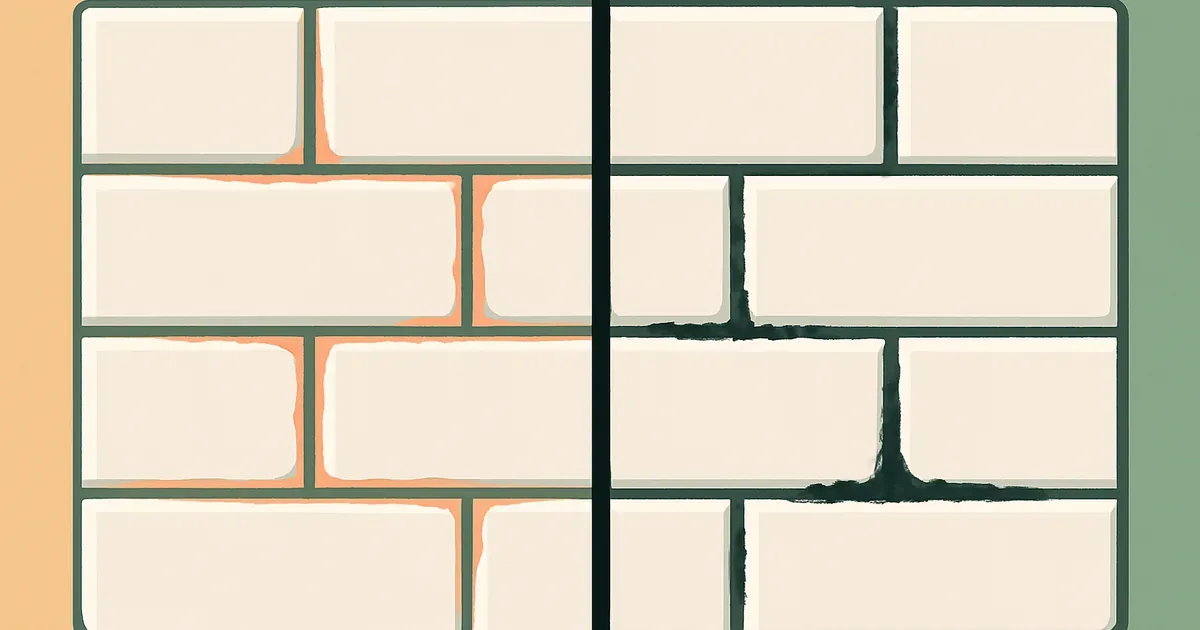
Biofilm (Enzymes Work Here)
Biofilm shows up as a general darkening or yellowing of grout lines. You’ll see it most in kitchens, showers, entryways, and other high-traffic areas. It’s caused by organic matter buildup and the bacteria feeding on it.
Signs of biofilm:
- Grout is evenly discolored, not spotty
- No fuzzy or raised texture
- Gets worse gradually over months
- Common in both wet and dry areas
Enzyme cleaners digest the organic layer and the bacteria feeding on it. The brush-and-dwell method (below) pushes the enzymes into the pores where the biofilm lives.
Mold (Enzymes Won’t Fix This)
Mold looks different. It’s typically black, green, or dark gray with a fuzzy or slightly raised texture. You’ll find it in damp areas with poor ventilation: shower corners, under sinks, along basement tile.
Mold is a fungus, not bacteria. Enzymes don’t break down fungal structures. Mold requires antimicrobial treatment with hydrogen peroxide, commercial mold removers, or a bleach solution.
⚠️ Warning
If you see black fuzzy growth on grout, that’s mold, not biofilm. Enzyme cleaners won’t remove it. Treat mold with a product designed for fungal growth, then switch to enzyme cleaner for regular maintenance to prevent biofilm from returning. For serious mold concerns, consult a professional.
The Brush-and-Dwell Method (Step by Step)
This is the technique that gets results with enzyme cleaners on grout. Spraying and wiping doesn’t cut it because the enzymes need time and pore-level contact.
- Sweep or vacuum the tile to remove loose dirt and debris. You don’t want surface dirt absorbing your enzyme cleaner before it reaches the grout.
- Apply enzyme cleaner directly to grout lines. Use a squeeze bottle for precision. Concentrate along the grout lines rather than flooding the entire tile surface.
- Scrub with a stiff grout brush to push the cleaner into the porous surface. A stiff-bristled brush (not a soft sponge) is key here. Work in small sections.
- Let it dwell for 30-60 minutes. This is the step that matters most. The enzymes need time to digest the organic buildup. If the area is warm or dry, lay damp towels over the grout to keep the solution moist.
- Scrub again lightly to loosen the digested grime from the pores.
- Mop or rinse with clean water and let the area dry completely.
- Repeat for stubborn areas. Badly neglected grout may need 2-3 sessions over a week. Each round pulls more buildup from the pores.
Brush-and-Dwell Method for Tile Grout
Sweep or vacuum
Remove loose dirt so enzyme cleaner reaches the grout directly.
Apply to grout lines
Use a squeeze bottle for precision. Concentrate on grout, not tile.
Scrub with stiff brush
Push cleaner into the porous grout surface. Work in small sections.
Dwell 30-60 minutes
Lay damp towels over grout in warm/dry conditions to keep solution moist.
Scrub again lightly
Loosen the digested grime from the pores.
Mop or rinse
Clean with water and let dry completely.
Repeat if needed
Badly neglected grout may need 2-3 sessions over a week.
Which Enzyme Types Work on Grout
Grout buildup is a mix of different organic materials, so a multi-enzyme formula works best. Here’s what each enzyme type targets:
- Protease: Breaks down protein-based grime (food residue, skin cells, body oils in bathroom grout)
- Amylase: Breaks down starch-based residue (food spills on kitchen tile, pasta sauce, bread crumbs)
- Lipase: Breaks down grease and fat (kitchen grout near stoves and counters)
Look for products that list two or more enzyme types on the label, or that say “multi-enzyme” formula. Single-enzyme products can work but won’t address all the different types of grime trapped in your grout.
Avoid enzyme cleaners that contain bleach or acid additives. Bleach deactivates enzymes on contact. Acidic ingredients can etch natural stone tile. A pure enzyme formula with no chemical additives gives you the most effective result. The EWG’s cleaning product guide can help you check product ingredient safety. The IICRC also offers guidance on proper cleaning methods for hard surfaces.
Best Enzyme Cleaners for Tile and Grout
When choosing an enzyme cleaner for grout, prioritize these features:
- Multi-enzyme formula with protease, amylase, and/or lipase
- No bleach or acid additives (these deactivate or counteract the enzymes)
- Concentrated version available (saves money and delivers more enzyme activity per ounce)
- pH-neutral (safe for natural stone tile like marble and travertine)
Most general-purpose enzyme cleaners work on grout. You don’t need a grout-specific product. The brush-and-dwell technique matters more than the brand. Biokleen Bac-Out, for example, works well on grout, drains, and pet stains with the same bottle. Not sure if a product you already own is enzyme-based? Check our guide on which products are actually enzyme cleaners.
For drain-related cleanup near bathroom tile, check our roundup of enzyme drain cleaners. And if you’re cleaning hardwood floors in adjacent rooms, the approach is different. See our guide on enzyme cleaner for hardwood floors.
💡 Tip
Adding a capful of enzyme cleaner to your regular mop water once a week prevents biofilm from building up in the first place. This small habit saves you from needing a deep scrub session every month.
Maintenance Schedule to Keep Grout Clean
Once you’ve done the initial deep clean, a simple schedule keeps grout looking good with minimal effort.
| Frequency | What to Do | Time Required |
|---|---|---|
| Weekly | Add enzyme cleaner to mop water, mop as usual | 10-15 minutes |
| Monthly | Brush-and-dwell on high-traffic areas (kitchen, bathroom, entryway) | 30-45 minutes |
| Quarterly | Full brush-and-dwell on all grout lines with 60-minute dwell time | 1-2 hours |
| After deep clean | Consider applying grout sealer to fill pores and resist future staining | Varies by product |
Sealed grout is easier to maintain than unsealed grout. Once you’ve done a thorough enzyme cleaning and the grout is fully dry, applying a grout sealer fills the pores and makes future staining harder. Sealed grout still benefits from weekly enzyme maintenance, but cleanings go faster because grime can’t penetrate as deeply. If you want to make your own cleaning solution, our homemade enzyme cleaner recipe works on grout too.
Tile and Grout Maintenance Schedule
Weekly
- • Add enzyme cleaner to mop water, mop as usual (10-15 min)
Monthly
- • Brush-and-dwell on high-traffic areas: kitchen, bathroom, entryway (30-45 min)
Quarterly
- • Full brush-and-dwell on all grout lines with 60-minute dwell time (1-2 hours)
After deep clean
- • Apply grout sealer to fill pores and resist future staining
If you’re also dealing with slow shower drains in the same bathroom, the same enzyme products can do double duty. Check our guide on enzyme cleaners for shower drains for the drain-specific method. You can also compare enzyme products head-to-head in our enzyme cleaner vs vinegar comparison.
ℹ️ Note
Enzyme cleaners are pH-neutral, which makes them one of the few cleaning products safe for both natural stone tile (marble, travertine) and colored grout. Bleach can discolor colored grout, and vinegar can etch natural stone. Enzymes avoid both problems. Always check the product label for specific surface compatibility.
Frequently Asked Questions
Can enzyme cleaner remove black grout stains?
Is enzyme cleaner safe for all types of tile?
How often should I clean grout with enzyme cleaner?
Can I use enzyme cleaner on colored grout?
Should I seal grout after cleaning with enzyme cleaner?
Cleaning Product Researcher
Sarah Chen is a pen name for our lead product researcher. A lifelong dog person who now shares her home with two cats, she's no stranger to enzyme cleaners. She writes the guides and reviews on this site based on product research, ingredient analysis, and real user feedback.